|
Hello everyone, and welcome to my 3D printing blog. My 3D printing journey started back in like the end of September of last year (2014) when I went to MakerFaire World, a faire for makers and tools that will help makers make things. The thing that surprised me the most about it was the amount of 3D printers that there were over there and the different shapes and ways they could print, so that day I left with a burning desire to buy a 3D printer.
Fast forward about a couple of months, I saw on amazon a 3D printer called the Oneup made by qb, I ordered one and since then I realized I was going to have issues with it. First, I tried to cancel my order because it had been a long time since I ordered and they had not shipped it, so I had to go their shady ticketing system and leave a message saying that I wanted to cancel it, no one answered it. About a month after that the printer was shipped to me. I recieved it and the assembly took about 2 days. At the begging it had some really crappy quality but with tinkering I was able to get some ok print quality. So after that I ran out of filament and time and I took a break from 3d printing. Then I ordered some black ABS because I watched a lot the Xrobots channel and that clogged my hotend and broke it (which was the default anubis hotend) I tried to take it apart and ended up breaking it, kek. After getting a new hotend, I was printing away for some time until the heater block which had two random hole, broke and started leaking filament so I had to order a new heater block for my hotend. Then when everything was working fine, I kept having issues with filament sticking to the bed, if you have used abs you know that sometimes can be really tricky to print, and more on a non-glass surface. I tried abs juice, hair spray, tape, and nothing helped with it. So I gave up printing with abs and ordered 1kg of white pla and it was so great, the quality improved so much and my printer was happier, but that did not lasted long. For some reason, my hotend kept clogging up all the time, I tried lowering and raising the temperature, nothing, tried moving the fan of the hotend around, nothing, tried cleaning the inside of the hotend, nothing. Nothing I did fixed the issue, it will always clog up. So I decided that I had enough (at the end ill discuss more issues I had with the printer) and I decided to buy a Prusa Mendel i3 from ebay at the begging of this week. My plan is to make some money back by selling the old printer by parts and some other stuff that I have laying around. I will try to document some of the build process and also the prints and issues I have with it. Another thing to note is that in my college's robotics club we have a Mendel i2 which we for some reason had for a while and no one new how to mess with it except for me. So I'll try to document that process as well. Should be fun applying the skills that I have learned into a whole different printer. Other issues I had with the printer: Sometimes while printing, because of the mass in the basalt heated bed, when printing at a moderated speed, the printer will vibrate a lot, to the point that it will start moving. One time one of my prints failed because the printer was about to fall off the table in which I had it, when I found it, it was hallways about to dive to the floor. 2. Sometimes the pulleys will start to slowly loosen up, and it will start affecting the prints. I remember once, the Y pulley got completely loose and it stopped moving on that axis and made a mess in the print. 3. The Z axis used to sag a lot, by some good mm. In the TwoUp it will get bad enough to the point that you will have to make a pulley mod. 4. The printer I had was made out of this very fragile lasercut wood, which will break extremely easily. Some spots were really hard to reach also for troubleshooting because you had to use zipties to keep it together, and to reach some parts you had to break them. The build was just horrible. 5. With the original setup, the hotend will be so unstable and woobly that it could ruin your prints, I had to put a lot of zipties in mines to get it to hold properly. 6. The print area was way smaller than what it supposed to be. It was like 80mm x 70mm x 90mm at least for me. 7. The Z treated rod will wooble and vibrate a lot to the point that you will have to 3d print a mod to stabilize it. 8. The heated bed is huge and ABS wont stick to it no matter what. 9. For some reason, the outside of the linear bearings I had got very rusted, not very sure why that happened.
0 Comments
Hey guys, so I got the Smart Bracelet i5 plus on the mail today, which is a Chinese attempt of a smart watch and I must say it is pretty good. One feature that I always wanted a smart watch for was to get incoming notifications from my Android. Although the bracelet has the feature, it is limited to Twitter, Facebook, Whatsapp, Skype, and text messages. I actually found a cool trick for the bracelet to display all notifications. Go into the Zeroner app, then go into the message push option. There select sms application. 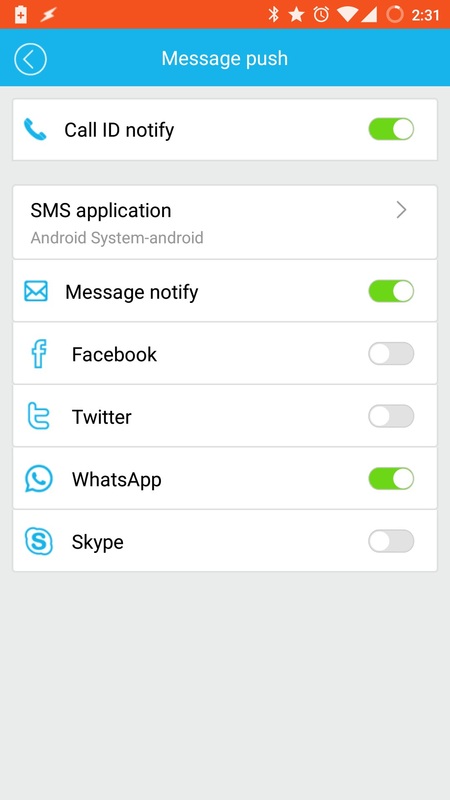 Now this is where the magic happens. Select the Android System option. Now, every Android notification will look as if you were getting a text message (in the notification, it will say "sms" and the text). That's it, now you can use your smart bracelet to check all notifications. If you have any questions or would like to say thanks, do so in the comments below.  [Update 05/23/2016]: I have seen that there is big flow of questions related to this watch. Many of them I cannot answer because my watch broke a long time ago due to some water getting inside of it (Yes, the smartband is not completely water proof, keep that in mind). However, I will try my best to write a Q&A below to help with any problems I can help with. That is the most I can do in my position. Q&AQ: I can't get my bracelet to show me my messages or notification.
A: Make sure that you have the zeroner app installed in your phone, and also make sure you have paired your smartband with the phone properly. Then if you are on Android you must enable the the notification access for the zeroner application. Go to settings > sound & notifications > notification access. Q: My smartband is not powering on the screen, but only powers on the led. A: Your smartband might be malfunctioning and you should return it to the seller. Q: My smartband won't stop vibrating. A: Your smartband might be malfunctioning and you should return it to the seller. Q: My smartband is powering on but I can't move through the menu. A: Your smartband might be malfunctioning and you should return it to the seller. Q: How to I enable sedentary reminders? A: Zeroner app > Device Settings > Sedentary reminders. Q: I can't get any notifications on my iphone A: This tutorial was made for Android devices, hopefully someone can help you in the comments because I can't. Q: My smartband keeps randomly vibrating A: You might have sedentary reminders enable. Q: How can I read the whole message instead of just the notification A: The way that this tutorial works, it will only show you the name of the notification that you got, not the actual text of the notification. For the apps supported by the zeroner app (Facebook, Twitter, whatsapp and Skype) it should show you the whole text of the message. If you can do some trickery with tasker or any other automation app which will make the message the title of the notification then it should work, but that is a very technical solution for this issue, consider getting a smartwatch if you want to see full notifications all the time. Those are the main questions that most people have been asking. Please, If you have any other questions, send them to whoever you got your smartband from, I can not help you guys because I do not have the smartband anymore. If you have a Linux server, or a computer who can be accessed from the internet by using secure shell, it is good practice to disable SSH root login, this is because most brute force attack try to login to your computer remotely by using the root username, and trying many different passwords until they match yours. Of course, it is also good practice to have a strong and long password too. In order to disable root login from SSH, you need to edit the file "/etc/ssh/sshd_config" and change "PermitRootLogin" to "no":
# nano /etc/ssh/sshd_config Find "PermitRootLogin" and change to "no": PermitRootLogin no Then you need to restart the SSH daemon with systemctl: # systemctl restart sshd After performing this procedure, you will only be able to login with your normal user, root user will be locked up. Of course, you can use your account to run commands as root with sudo still. This will protect your machine from bruteforce attacks. For more information on protecting Linux machines, you can check the article in the Arch Linux wiki which talks about protecting SSH by clicking here. Hey guys. Sorry that I have not added any content in such a long time, but I have been extremely busy with school and life. Anyways, I switched to Arch Linux not long ago, and decided to use Antergos to make my life easier. The theming was good, as well as the pre-installed applications, but there was something that bugged me all the time about the pre-sets, and it was the use of LightDM as the default display manager. Personally I like GDM better because it goes staight to the point, and also, I was having a problem where LightDM will hang completely, to the point I had to restart my computer every time I locked my computer. So, I decided to switch it completely. Here its how you can switch from LightDM to GDM:
First, install GDM: # pacman -S gdm Disable LightDM: # systemctl disable lightdm Enable GDM: # systemctl enable gdm Restart in order to test that everything went fine, and that's it. If you would like to go back to LightDM, here its how to do it: First, disable GDM: # systemctl disable gdm If you want to uninstall GDM, use the command: # pacman -R gdm Enable LightDM: # systemctl enable lightdm There, you go, that is pretty much it. I would like to plug the people at Viva Antergos for writing the original source. I was born and raised in a Spanish speaking country so I was able to translate their article, which you can access by clicking the link below: http://viveantergos.blogspot.com/2014/04/cambiar-lightdm-por-gdm-en-antergos.html There you go, and just a reminder that you can use this tutorial for any other display manager by switching GDM for another one, such as KDM. I wrote this tutorial in like 10 minutes, so if you find any errors, please let me know, I really appreciate it. Also, if this tutorial helped you, don't forget to share it or just leave a comment below. Hello everyone, so recently I was using Cinnamon on openSUSE 13.2 and while trying to install extensions the message "There was a problem loading the selected item and it has been disabled" kept popping up, not allowing me to install the damn extensions. After doing some research, I found what was making the extensions not work, and it was that there is a configuration file in each of these extensions which has a Cinnamon version number which does not match the installation's one. Here its how to fix it: Step 1: Open your terminal by pressing CTRL + ALT + T or by looking for it in your applications launcher. Step 2: Move to the folder where the configuration of the desired extensions by doing "cd ~/.local/share/cinnamon/extensions/[extension name]" replacing "[extension name]" with the actual name of the extension. Example: cd ~/.local/share/cinnamon/extensions/DesktopCube@yare Note: If you don't know the names of your extensions, you can always do "ls ~/.local/share/cinnamon/extensions" and see the names of your extensions, from there you can just copy and paste them into the above command. Step 3: Edit the file called "metadata.json" by typing "sudo nano metadata.json" (Note: if it says that nano is not installed or something of that sort, you can install it by doing "sudo apt-get install nano" on Ubuntu, Mint and Debian, or "sudo zypper install nano" for openSUSE). You will see something like this: 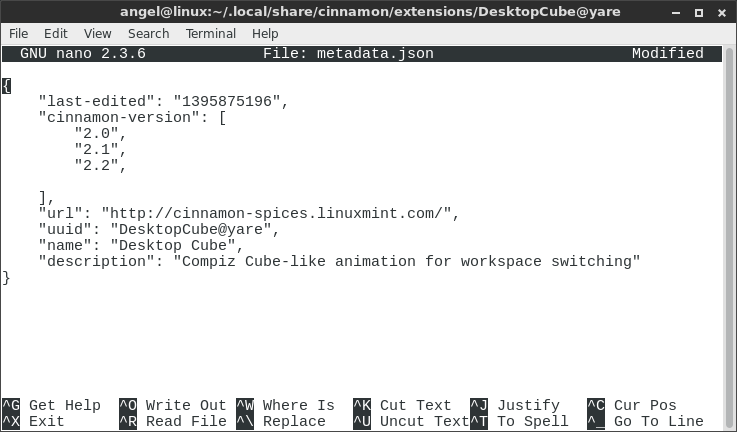 Step 4: Add "2.4" to the line that says "Cinnamon-version", like so: 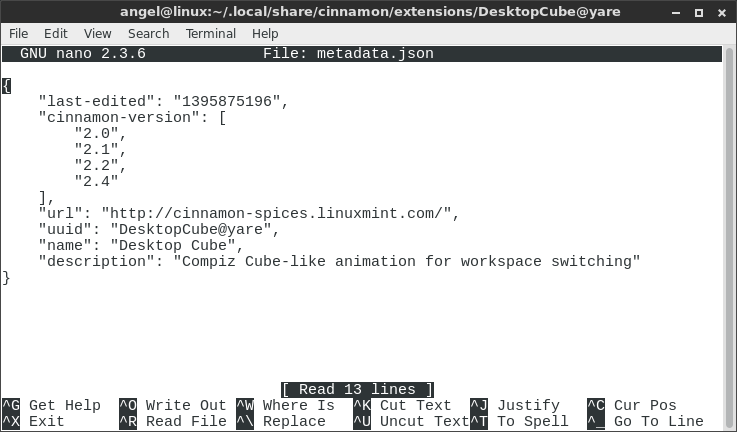 Step 5:
Press "CRTL + X" and then type "yes" and the file should save. Your extensions should work now. Note: Keep in mind that you might have to do this for all your extensions because most of them suffer from this problem, as you can see, it is a problem of not properly updating the extensions when a new version of cinnamon comes out. That's pretty much it, I hope that I was able to help you fix this very annoying problem, and if I was not, then let me know in the comments and I'll be glad to change anything in this tutorial or if I missed something also let me know. Hello everyone, it has been a while. A long time ago, when I was beginning to use Linux, I found myself missing the layout of the Windows Skype which was that one window layout where at one side you will have your contacts and next to it you will have your conversation, and then I found this application called Skypetab-ng, which is as close at it will ever get to that layout. Installing Skypetab-ng You can easily install Skypetab by copying and pasting the following code in your terminal (Only working on Ubuntu based distributions): sudo add-apt-repository ppa:keks9n/skypetab sudo apt-get update sudo apt-get install skypetab-ng When you are done installing it, you should have two different instances of Skype, one that is the normal Skype and another one that is the Skypetab one. In order to get it to work you need to always launch the Skypetab one. 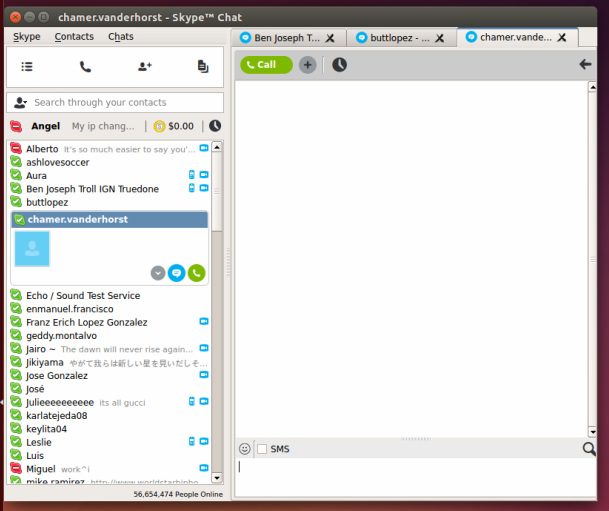 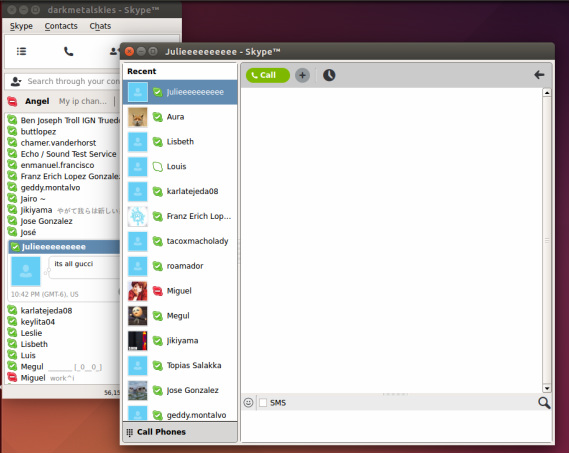 Skypetab puts all your windows in one, and instead of you clicking the contact every time you want to chat with him/her, you click a the tabs at the top right. This system can be more convenient if you are chatting to with a small amount of friends and you want to have them there all the time and be easy to find, mostly when you have many contacts. That's it, now you have a Skype that looks close to the one on Windows, and by the way, THANK YOU MICROSOFT FOR BARELY UPDATING SKYPE FOR LINUX YOU FUCKING ASSHOLES, EVEN THOUGH IT IS A DIFFERENT PLATFORM, WE ARE STILL USERS OF YOUR FUCKING SHITTY SERVICE SO GET YOUR SHIT TOGETHER AND TREAT US LIKE YOU TREAT WINDOWS/MAC OS USERS. ( at least we don't have ads on Skype for Linux but still, fuck). If Microsoft cared more about the actual users instead of looking at the platform itself as the competition, I will not be wasting my time writing this post.
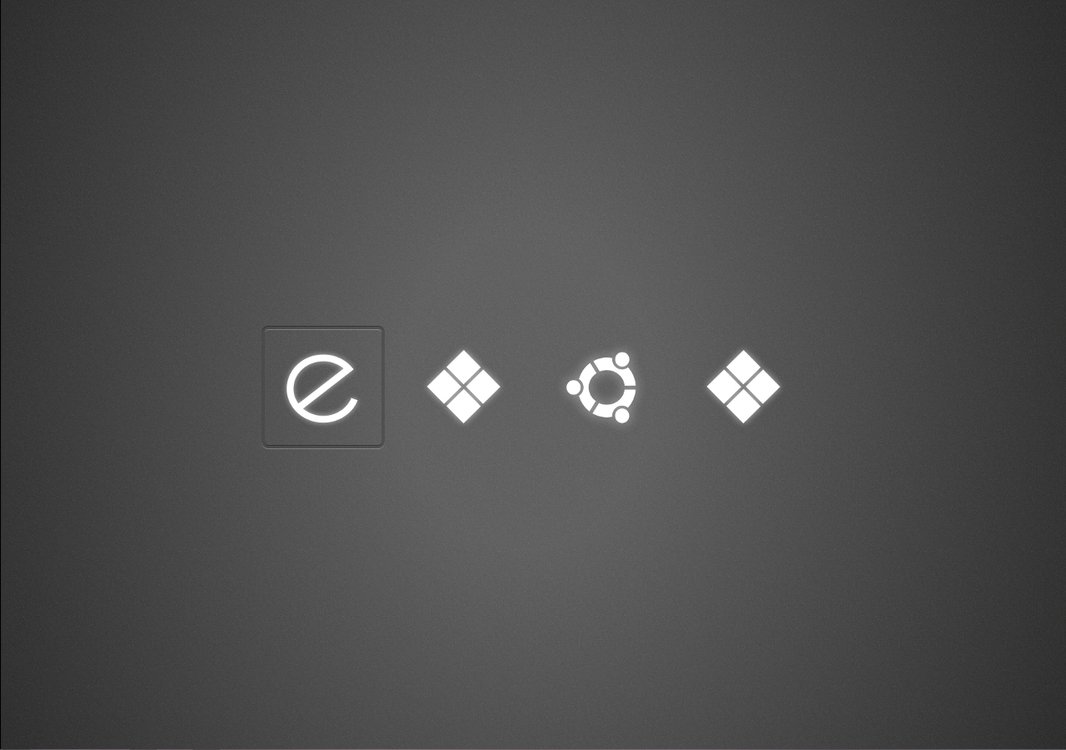
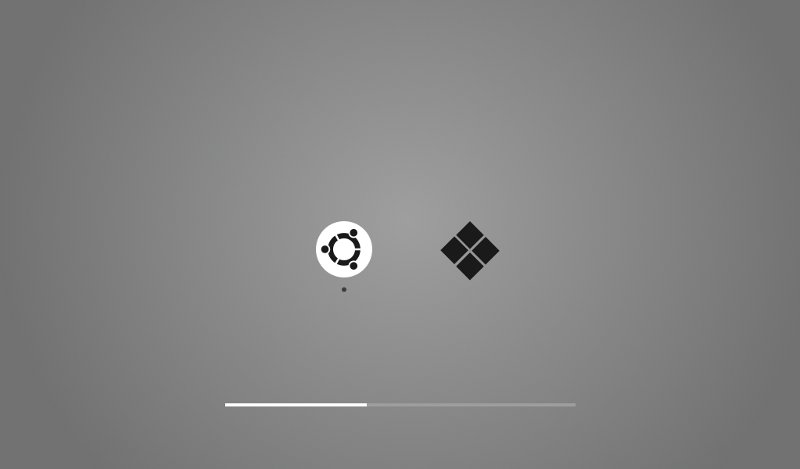
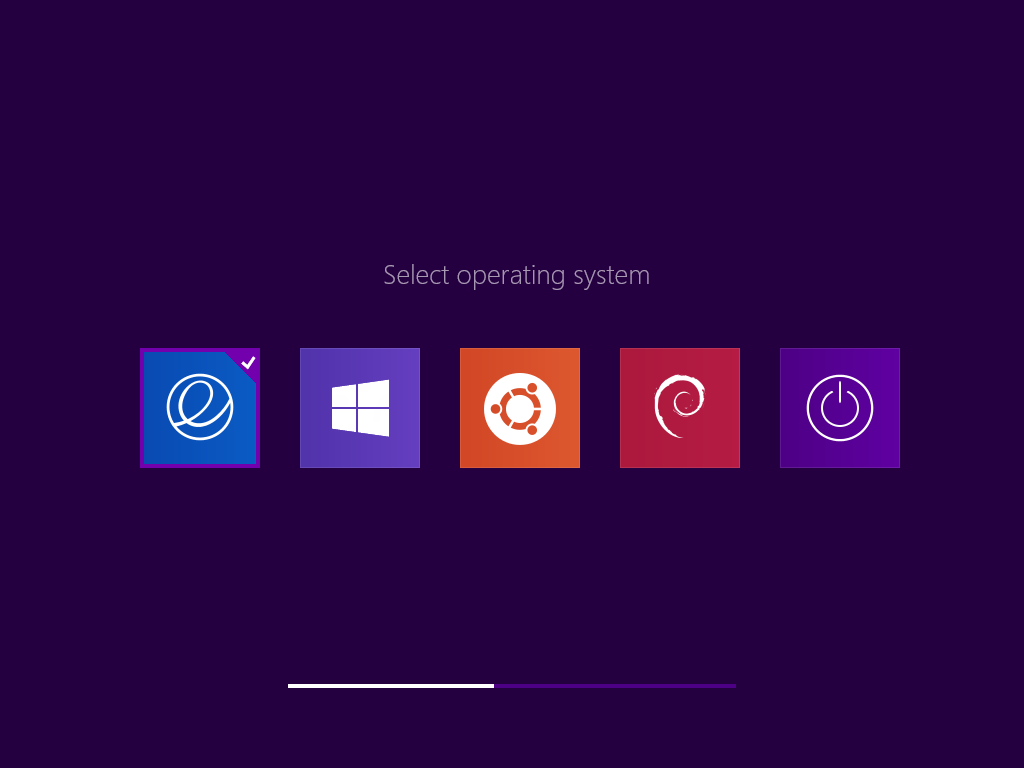
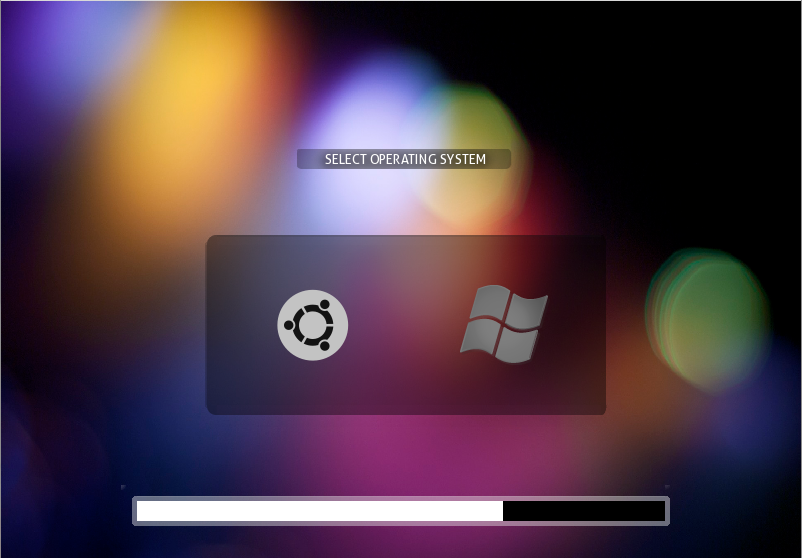
You can find the blog of the developer of this app here [Click Here] and his github page here [Click here]. Also, if you want to see skypetab in action click here [Click Here]. Thank you for reading, if you have any questions regarding this application or its installation you can leave a comment in the comment section or you can contact me directly, my information is in the contact tab. Hello everyone, today I am going to show you how you can install and configure an application called Burg which will remove your grub2 and install the app instead, then you will be able to choose from many different themes out there to make your booting process more appealing. The picture below shows one of the themes that will be included for burg in this tutorial, as you can see, it is more stylish than the booting menu interface of Grub2. This tutorial should work on Ubuntu 14.04 or any other Ubuntu based distribution that was based of that release, and also 12.04 but I am not completely sure (since I have not tested it in other releases other than 14.04). 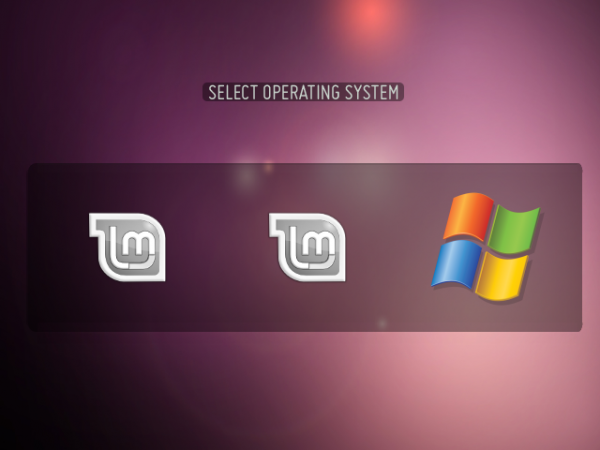 Installing Burg In order to install Burg, you need to open your terminal by pressing "CRTL + ALT + T" or by searching for it in your applications menu. Next, we are going to copy and paste each of the following lines separately to the terminal and press enter. sudo add-apt-repository -y ppa:n-muench/burg sudo apt-get update sudo apt-get install burg burg-themes When installing, you will get something like the image presented below, you need to press the space bar and it will put an asterisk in the box. What this is doing is selecting the hard drive in which you will be installing Burg, which should be the same one where your system is installed. If you press TAB it should highlight the "<Ok>" and then press enter. This will conclude the installation process. 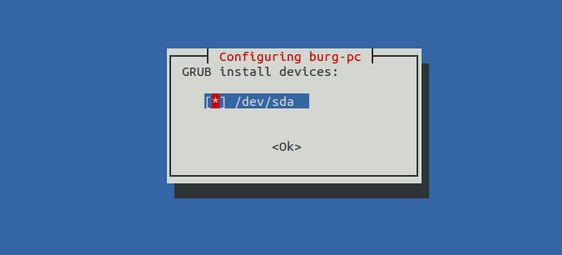 Installing Themes Now that we have Burg already installed, we can install some themes. By default, Burg will bring a somewhat decent amount of themes, but I have found four themes that I think will look fantastic in anyone's machine because they are simple and minimalistic, yet they look great. When you download the themes from their respective devianart pages (the download is located at the right side of the page). You are going to unzip them in your desktop, from there we need to move them to the Burg themes folder. In order to do this you need to type a command like this in your terminal: sudo cp -R ~/Desktop/foldername /boot/burg/themes Where "foldername" is the name of the theme folder that you want to move. If you think you are fine with the themes given, you can skip to the next part. There should be a space between the first path and the second path.
Configuring and Testing Now that we have Burg, as well as our themes installed, we need to run the following command: sudo update-burg This command will allow Burg to find the new themes that we have installed, as well as the operating systems installed in your computer. Now we can see what our Burg will look like by using the command: sudo burg-emu Now here we can change our theme by pressing the F2 key, select a theme and press enter and the theme should change. Now, we want to restart our computer because we need to go on the real deal and change the resolution of our Burg. In order to change the resolution we need to press the F3 key when it show us where we can select our operating systems. When you get to change the resolution you will see how much better it will look. Restore Grub2 If for some odd reason your Burg does not work or you want to just go back to the good old Grub2 menu,you can re-install it by using the following command: sudo grub-install /dev/sda This will restore your old Grub2 menu. Now we are done! We should have a really fancy boot menu that you can show to your friends and family or you can brag about on /g/. If you have any questions related to this article please leave them in the comments below or contact me directly, my information is in the contact tab.
|
Angel MercedesElectrical Engineering student and lover of all things Open Source, 3D Printing, Electronics and Linux. Categories
All
Archives
May 2017
|
 RSS Feed
