|
Hello everyone and welcome to my second Linux blog, in this occasion we will be learning how to install and remove applications as well as updating your whole system. Installing Software I think that there is no need for explanation here, installing applications is one of the most important things that you need to know in order to understand your operating system and be able to get the full potential out of it. Of course, there are a lot of good applications installed by default in Ubuntu, but who in his right mind does not use applications other than the default ones? Here are three methods used to install applications on Ubuntu: Method 1: Ubuntu Software center Created by the Ubuntu developers, the Ubuntu software center was created in order to blend in with the entire ecosystem and providing an easy to use way to get applications. If you have a newly installed install of Ubuntu, the software center icon should be in the dock looking bar located at the left of your screen. Click it and it should open the software center. In the search bar located at the top right of the app you can type a type of app or a name of an app to search for it. 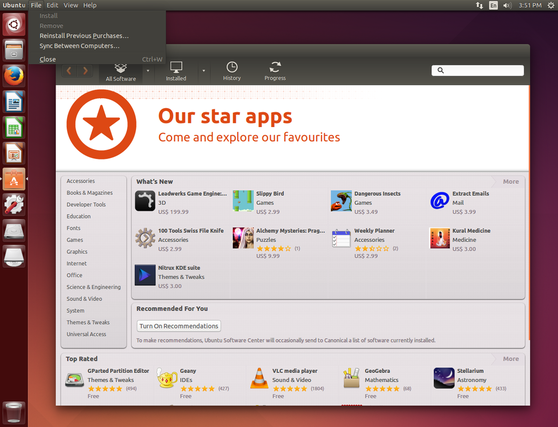 When you search for an app, you will see results and if you click one of the results a screen like the one shown in the left will show up giving you the name of the app, the ratings, description, screenshot and also comments about the app itself. There are also some rare occasions where you can add add-on to the application. 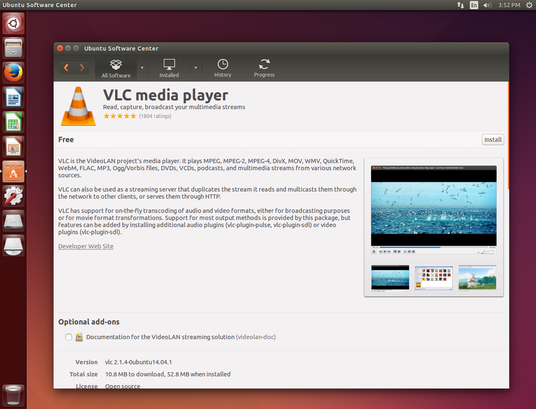 If you click the install button, a small little window will appear asking you for your password. Like I said before, Linux focuses on security, this is why even for installing, removing an app or even updating you are required to provide your password. After the application is done installing, you will see a shortcut of it be added to the bar at the left of the screen. 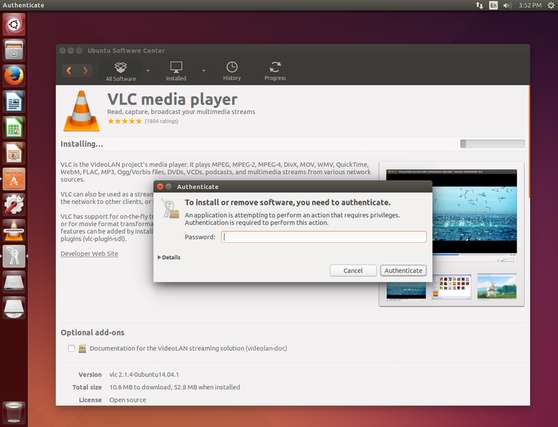 Method 2: Terminal (apt-get install) Here is where things get interesting, the terminal. Although it might seem scary, it is not, the terminal will be your friend and if you know how to use it wisely, you will have a very pleasant experience. In order to open the terminal, you can either tap the windows key (on windows keyboards) and then type "Terminal" and press enter, or you can press CRTL + ALT + T and it should open up. 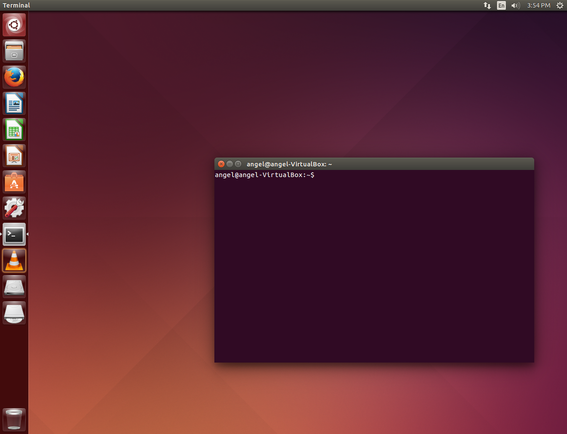 Next we want to run the command "sudo apt-get install [name of the app]" (where [Name of the app] will be the name of the application that we want to install) In my case, I wanted to install the application "chromium-browser" which a Linux version of the web browser Google Chrome, so the command will be "sudo apt-get install chromium-browser. When installing through the terminal, you need to know the name of the application that you want to install, because some might contain dashes like the example below, and some will be only one word. 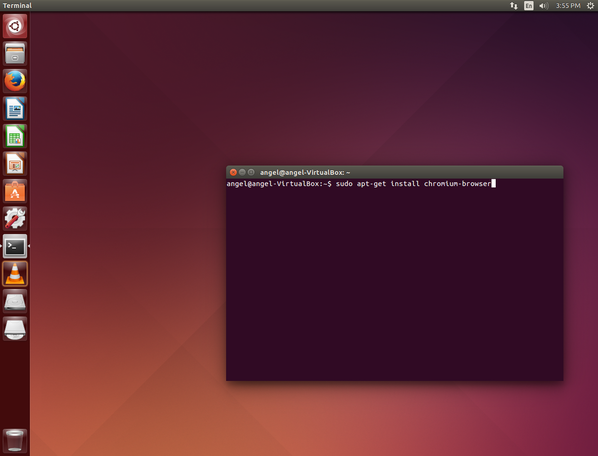 Next it will ask you for your password. Even though you will not see any characters displayed, it will be recording your keystrokes. Type your password correctly and then press enter. It takes a little bit to get used to it. The reason behind having to put our password is because we are running the command with the "sudo" command at the beginning of the line which makes it run as the super user (or as the administrator for Windows users).  When we send the command, the system will tell us the packages that will be downloaded and will ask us if we really want to install them, you can either type "y" to accept them and then press enter or you can just press the enter key. If you do not want to accept you can just press the "n" key and then enter. After the process going on in the command line stops, your application will be installed and you can look for it in the dash by pressing the windows key in your keyboard and typing the name of the application. 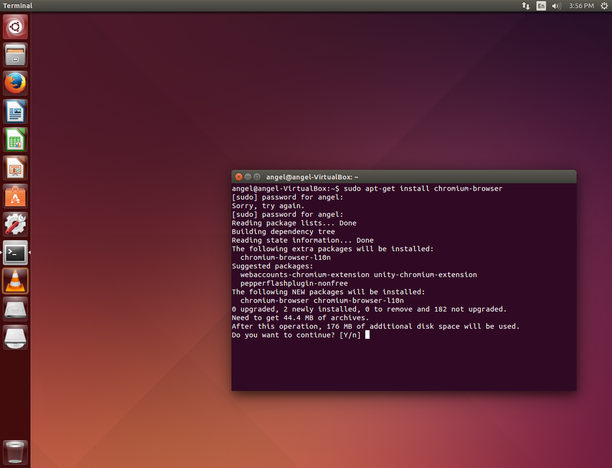 Method 3: .Deb file The third method here of installing apps might remind you a little bit to windows, the .deb package. These type of packages are binary packages that hold important information for the application to be installed. This type of packages is used only for Debian based distributions, such as Ubuntu, Mint, Elementary and others. If you want to learn more about .deb packages here its some information for you. [Click Here]. There are also other type of files similar to .deb, such as RPM packages which are used in most other distributions, such as Fedora, Opensuse, and Pclinuxos. In this example, I will be downloading Skype from their web page and I have selected the one for Ubuntu and then it will just automatically download. Some web pages also can, instead of providing .deb packages, provide ppas or Debian repositories directly, that it just a little bit more complicated to explain and you will encounter it a lot online if you are following tutorials related to Ubuntu, don't worry I will cover it in a future post. 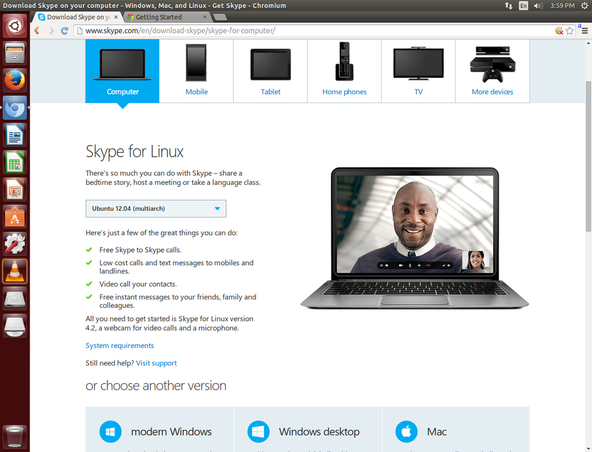 When we have downloaded the .Deb package, it should be in located in our downloads folder. Look for it and double click it. When you double click it, it will take a little bit of time and then will open the Ubuntu software center. Where some information about the app will be provided to you and other simple things like in method one. 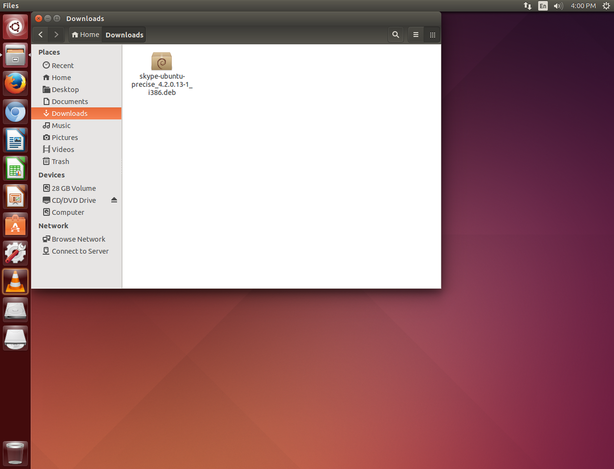 After it is open, just click on install and then type your password, same as in the method number one. Eventually I will make another tutorial for installing deb packages but with an application called "gdebi" which is only used for installing deb packages, it is a very solid application and performs very fast this task. 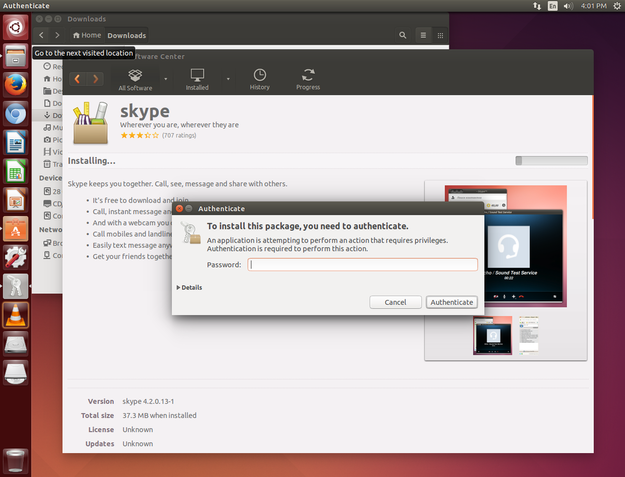 Removing Software Like installing applications, removing them is also a very important process, for instance to save up space in your disk or remove conflicting applications, or even because you found a better application that does the same job. Here I will be showing three different methods to remove applications installed in your system: Method 1: The dash The first method that we will be learning is very easy, just go on the dash by pressing the windows key on your keyboard, look for the app that you want to uninstall and then right click the app, a menu like the one shown in the image below will show up, there will be some description provided as well as two buttons, uninstall and launch, just press uninstall in order to uninstall the application. 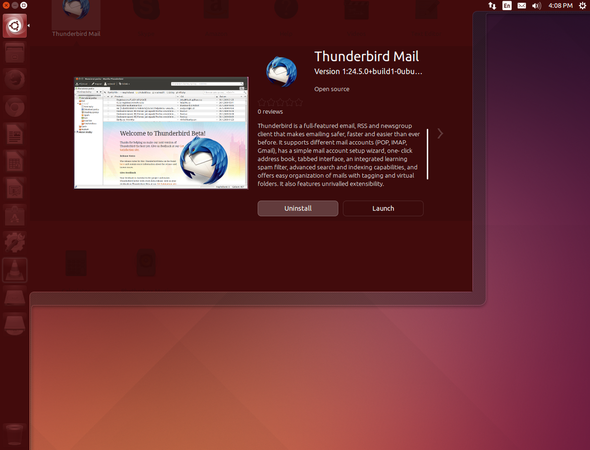 Method 2: Using Ubuntu Software Center You can also use the Ubuntu Software center in order to uninstall applications as well. You can either look for the application on the search bar, click it and then click uninstall or like in the case shown at the left, you can click the "Installed" tab, here you can see all the applications that you have installed in your system organized in sub-menus depending on the function of the application itself. 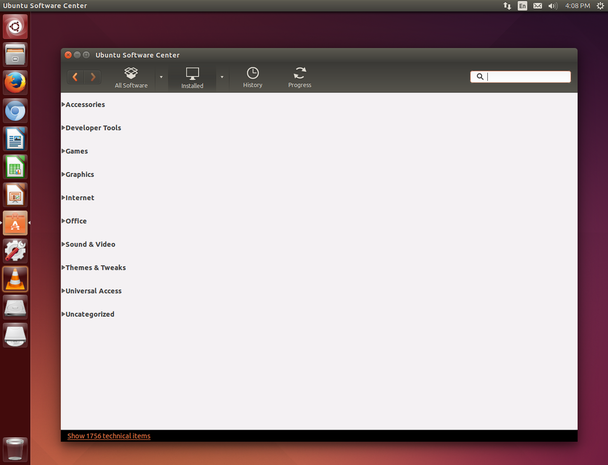 When you click one of the sub-menus you can see the applications inside of them and when you click one of those applications you can see two buttons as before, one that says "More information" and another one that says "Remove". To uninstall any application there you you just press that remove button. 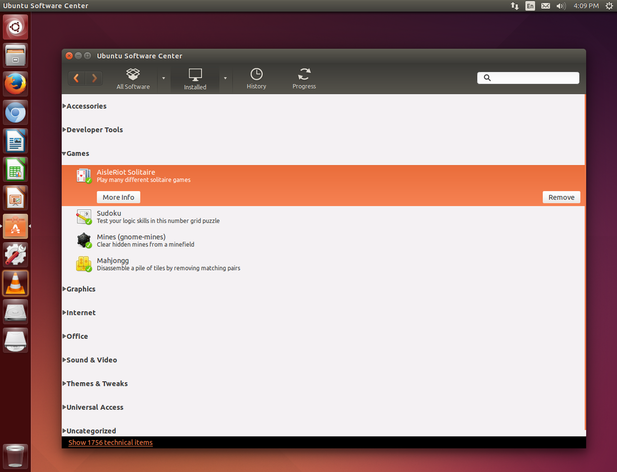 Method 3: Terminal (apt-get remove) Removing applications with the terminal is almost the same thing as installing them, instead of using "sudo apt-get install" we use "sudo apt-get remove" followed by the name of the application. 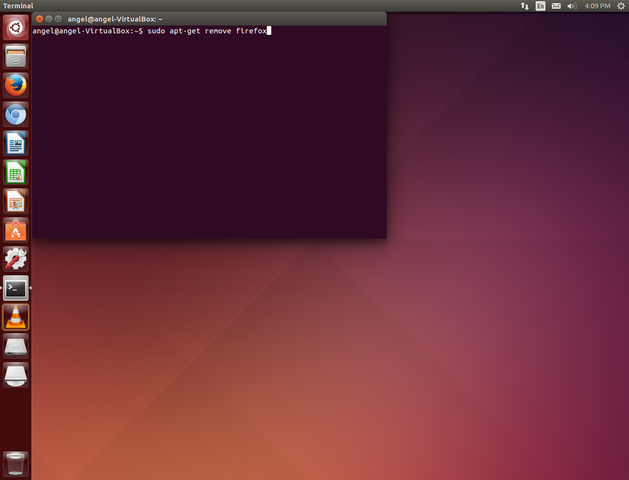 Updating your system Updating your system and your applications is one of the most important things that you are supposed to know when you are using Linux, this is because it will keep your system fresh, secured and with the latest features. Here are three ways in which you can update your system on Ubuntu: Method 1: Using the "Software Updater" Ubuntu has an application called the "Software updater" which comes by default with the distribution that allow us to update your system. In order to find the software updater, press the Windows key in your keyboard and type "update", the first application that comes up will be the software updater, press enter and it will open up. 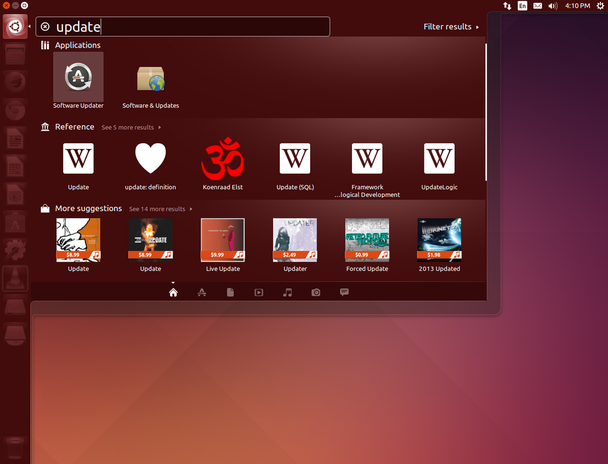 After we open the app, it will start looking for updates, it can take some time depending on the amount of applications that you have installed or the repositories that you have added in your system. When it is done looking for updates it will show a small window like the one at the left showing the amount of updates that are required, as well as the size of the download. Click install and it should update your system. 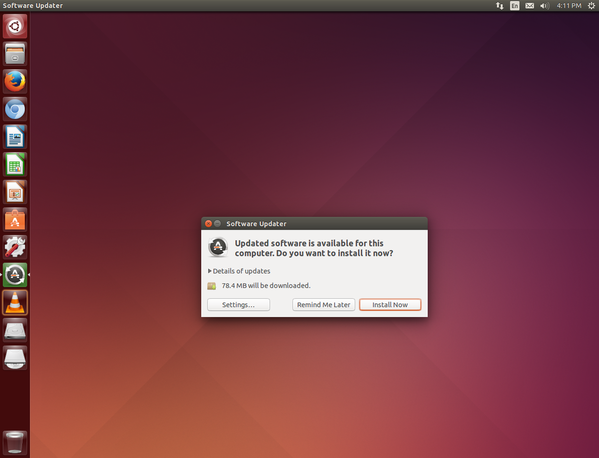 Method 2: Using the terminal (apt-get upgrade) The second method that we will be using is the terminal. In order to update your system through the terminal you must type "sudo apt-get upgrade" which will pull down all the updates and install them. We must not confuse this command with "apt-get update" which is used to update the list of repositories, which will be soon touching in a future post. We do not need to type anything after the "upgrade" word because we are updating the entire system, not just an application.  Congratulations, you have learned how to install, remove applications as well as update them. Now you can go on and install and test applications out there! in my next post I will be talking about ppas as a way to add applications that are not included in the repositories list of the distribution. If you have any other alternative ways of doing any of these processes shown above, do not hesitate to contact me and maybe I will update the post with your suggestion.
0 Comments
Hello everyone and welcome to my second post on learning Linux, today we will be learning how to install a real Linux distribution (Ubuntu 14.04)! [Insert yay sound]. For this tutorial you will need:
The reason that we will be using Ubuntu for this tutorial is because Ubuntu is one of the most well known and easy to use Linux distributions out there, their target is beginners that come either from Windows or from Mac OS . The community support for Ubuntu online also is very wide and if you have a problem on Ubuntu, it is likely that you will find the answer with a Google search. Although there are many other distributions that target beginners, there are a lot of distributions based on Ubuntu into after you learn the basics of installing and running Ubuntu. We will also be putting an image of Ubuntu in a flash drive in order to use it as the installation media, this is because this way is more convenient, rather than burning the image in a CD, we can just copy it to a Usb and use it that way, which will save us money and also will allow us to just format the usb and be able to reuse it again. This process won't harm the usb flash drive at all but if you have any information inside of it, please back it up somewhere safe where you won't lose it, because this process will delete all information inside of the usb. Preparing a USB flash drive with Ubuntu 14.04 for installation Downloading Universal USB Installer In order to start this tutorial we need to download two required items which are the program that we will be using in order to copy the Ubuntu image in the usb. First, let's download the Universal USB installer which can be found here [Click here]. When you get to this page, go down and click the button that says "download UUI" and it should download to your Downloads folder. Personally I love this tool because It is extremely reliable and at the same time gets the job done. Downloading Ubuntu 14.04 Next, we will head to the Ubuntu page in order to download the Ubuntu 14.04 image [Click Here]. Here we will have the option to choose between a 32-bit image or a 64-bit image which reffers to the architecture of the processor that you are using. If you know the architecture of your computer, choose accordingly, If you have more than 4Gigs of ram, download the 64-bit image, if you do not know your architecture and you have 2gigs or less of ram, download the 32-bit one (you can see the architecture of your cpu in "my pc", here its a video on how to determine the architecture of your computer in windows 7 [click here] ). After you choose the architecture from the drop-down, then click Download, the file should download to your Downloads file. Copying the Ubuntu image to the Flash Drive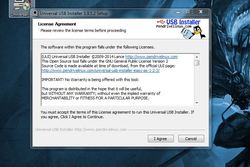 After we have downloaded the two files, we will head to the Downloads file and look for the Universal USB installer file and double click it, we also need to have our USB Flash drive connected at this point. When we open the program, we will be greeted with this screen, click "I agree" to move on to the next step. 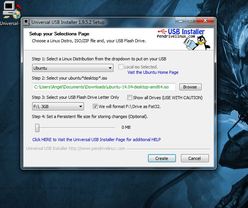 Now we are greeted with this screen, there are several options in this screen that we must break down for your understanding of this tutorial, don't worry this is a piece of cake if you know how to follow instructions. In the first option that starts with "Step 1" there is a drop-down menu with a list of Linux distributions to choose from, in our case we want to select "Ubuntu" because it is the one that we will be using for the sake of this tutorial. The option that is labeled as "Step 2" asks us to choose the Linux distribution image of the distribution that we have selected above, click the "Browse" button and look for the Ubuntu 14.04 image that we have downloaded before. Next is "Step 3" here we want to choose the USB that we will be using, please be careful and make sure that the USB that you are selecting matches with the one that you are using, to be even more careful, disconnect any other USB flash drive that you have plugged to your computer if you have others. Next we want to check the box that says format just in case, this will wipe the flash drive completely. Now the next step, "Step 4" is to set a persistent file size, and this will be extremely useful if you would like to use that USB as a livecd, I will explain to you later on how to do this. For now, lets just keep it as 0, mainly because it will take longer to create the flash drive if we add more. 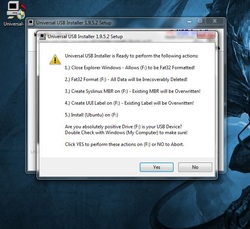 Click create and this window will pop up warning us that our data in the USB will be deleted, just click "Yes"and the process of copying the image will begin. 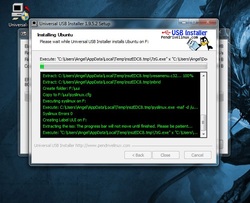 Now you can go and grab a cup of coffee or watch a video on YouTube (Maybe a Tek Syndicate video or LinusTechTips) while it copies, should not take long depending on the speed of your flash drive. 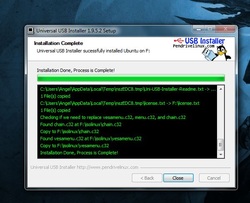 Now it is finally done, just click the "Close" button and we can now proceed to the harder part of this tutorial, booting and installing the distribution. Booting and Installing Ubuntu 14.04 Now that we have prepared our USB flash drive with the Ubuntu image, we need to restart our computer and boot from the USB. This is where it gets a little bit tricky, when our computer is first booting, maybe at the top or bottom of the screen it will say "Boot menu" and will say a certain key to press, for instance, one of my computers says F12, another one says F11 and another one says ESC, all the computers have different keys to enter the boot menu, but I believe that you can find which key is (I believe in you!). When you press this key, a menu will show up, you will use the arrow keys in your keyboard to select the name of the USB that you will use, for instance some USB flash drives have just the brand of it, hover over it and press enter and it should boot from it. Welcome to the installer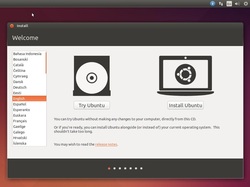 When you boot, you will see an Ubuntu logo and it will take a little bit to load and then you will see a window as the one shown at the left of this paragraph, here you will choose your language and then we have two options: Try Ubuntu: This is what is called a "LiveCD" which allows you to have a complete desktop, with all the tools that the Linux distribution will bring in it, this extremely useful because you can plug the USB in any computer and use it as if it was your personal computer. Do you remember before that step that asked us if we wanted to allocate a persistent file size? well this is where it will be used. If you set a persistent file size, if you use the LiveCD mode, all your changes can be saved, all your configurations, files, and programs installed, which pretty much gives you a full fledged personal desktop experience by using a USB. This feature came to be extremely useful for me in high school where we used to hoop into many different laptops and desktops, I was able to use my favorite distribution, keep all my configurations and programs while moving around. Also this environment includes an application called "Gparted" which allows you to create partitions and manage them. By using this, you can also retrieve files from computers that have non-functional or completely broken Operating systems like lets say a Windows 7 computer full of viruses. Install Ubuntu: As it's name states, it will allow us to install the Ubuntu distribution, since we want to install Ubuntu, we need to click this option. Preparations before installing...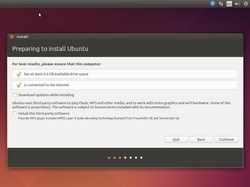 Now, Ubuntu will say that for a best installation results, we need to first be have enough space to install the distribution in, the computer needs to be connected to a power source and also needs to be connected to the internet. If you are using a laptop, at some point it will ask you to connect to a wireless network, if you do not have a wireless connection, it will just say that you can not install updates while installing or install third-party-software. Now we will have two check-boxes below: Download updates while installing: this process will make the installation process a little longer, but I will recommend it because it will automatically update your system while installing it and by the time you get to use it, all the applications will be updated and the system as well (Although we could just update our system after it installed and we will have the same result). We want to enable this option. Install Third-Party software: This is a must have, it will install proprietary codecs and software in order for us to enjoy media and other files, such as MP3 files and flash. We also want to enable this to have the best out of the box experience as possible. Note: Depending on the system that you are installing Ubuntu in, the next step could be either setting up your wireless connection or the step below. Setting up your network is pretty straight forward so I believe that there is no need for covering that step, either way after that one the next step will be the one presented below. Choosing an installation type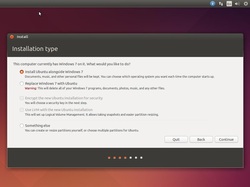 Click continue and you will be presented with this window. Now here we have different options that we can choose depending on our situation. Install Ubuntu alongside Windows 7: This option will install Ubuntu alongside Windows 7 and will divide the hard drive space depending on how you set it up to be, which will be the next step in this tutorial. We will be selecting this option for the sake of this tutorial but you can choose any of the other options if you know what you are doing. Replace Windows 7 with Ubuntu: This option will wipe out the entire hard drive and install Ubuntu in the entire hard drive, we do not want to select this option because it will also wipe our Windows 7 Installation. If you want to actually replace Windows 7 with Ubuntu, then go ahead and do it. Something else: In this option we can do our own partitioning, this is a more advanced option, but we might talk about it in the future because it is important to know how to do your own partitioning. Installing alongside Windows 7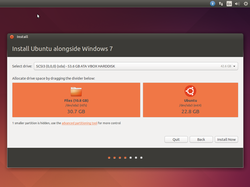 When you click continue, you will be shown a window similar to the one in the image to the left, here is where we will be choosing how much space we want to give to Ubuntu. In order to choose the amount of space that we will allocate to our Ubuntu installation, we need to select that small white bar that is in the middle of orange rectangle and either drag it left or right. After we are satisfied with our selection, we will click the "Install now" button and the installation will begin. Choosing your location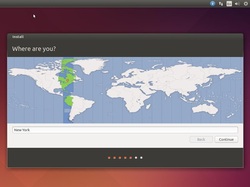 While the installation is taking place, we need to set some other stuff up. When we get to this screen, we need to select our time zone or where we are from. We can type it in the small box below the map or we can click the map directly, I live in NYC, but the installation media selected it for me automatically. When we are satisfied with our selection, we click "Continue". Choosing your keyboard layout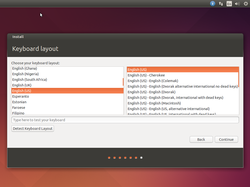 Now we have to choose our keyboard layout, it should be set automatically for you, but if this does not happen, you can set it up manually, the first square from left to right has the language and country and the right square has the layout of the keyboard. When you are satisfied and you have tested that your keyboard works as you want it to, click "Continue". Provide personal information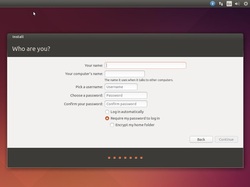 Now it is time to tell Ubuntu about us. Here we have to give our name, a password and a name for our machine. Your name: Here is where you want to put your name. You can either use your first name, first name and last name or even a nickname. Your Computer's name: This is the name that your computer will have. This will show only in the terminal and in your network. Pick a username: Here you will make a username for logging into your computer and logging into the terminal as super user. Usually this will be in full lower-case. Choose a password: Here you will create a password for your user and then you need to confirm the same password below. You can set whatever password you want, there are no restrictions. Log in automatically Vs Require my password to log in: By default, it will require your password to be able to access to log in into your account, but if you would like to set it so you don't have to always input your password to log in, you can also do so, it is more a matter of security and privacy. Encrypt your home folder: This option will encrypt the folder where all your user information (such as music, videos, downloads, etc.) is stored, that way if someone wants to steal your information, with something such a livecd or any other tools, they won't be able to access it. When you are happy with your selections, click "Continue". Almost there!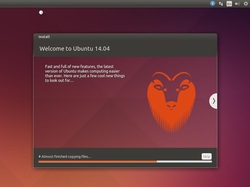 Now we are done setting up stuff and we need to wait for the installation to be done. Here we are presented with a small slideshow that we can check out with information about what is new in this release and also some default applications provided in the distribution. Now we are done!!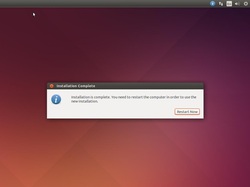 Now the installation is over! we will be greeted with this small window saying that the installation has been successful, click the button in it and your system will restart. Now we will see what is called the "Grub2" which allow us to choose the operating system that we want to boot from, we should see at the top "Ubuntu" and at the bottom of the list "Windows 7", we can choose the operating system with the arrow keys of our keyboard and select by pressing enter. 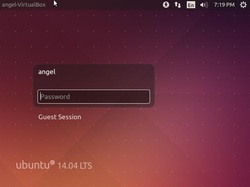 If our installation was successful, we should be able to see a screen like this, this is the log in screen of Ubuntu, we here can type our password and enter our new Ubuntu installation.  Annnddd... Congratulations! you now have a fully functional Linux install. This desktop that you see here is called the Unity desktop environment and it is unique to Ubuntu. It is very simple to use and to understand, tinker around with it and learn its ways. Again, congratulations, not a lot of people make it this far, even though it is not that complicated to install a Linux distribution. Now it is time for you to tinker around and check everything that is provided with the distribution. In my next post, we will be installing and removing applications, as well as updating your system and the different ways in which this can be achieved. Thanks for reading, if you have any questions you can post it in the comments below or contact me directly, my information is in the "Contact" tab.
Hello and welcome to the first post related to the Linux Operating system (or kernel, whoever you want to refer to it as) during these (course or tutorials or whatever) we will be learning about the basics of the operating systems built on top of the Linux kernel. In this (whoever you want to call it) we will be learning how to use a desktop Linux distribution, if it sounds hard, don’t worry, it will not be unless you know how to follow steps and you can learn from your own mistakes. In order to clarify some questions that new users have when switching to Linux I will be answering some questions below that will give you a better understanding about what you will be dealing with.  What is Linux? If you said to yourself, “I know what Linux is, it is an operating system” you are wrong, Linux is not an operating system. Linux is an Unix-like kernel, meaning that you can perform many of the commands used in Unix (If you do not know what Unix don’t worry, you might have not been alive when it was created). People tend to call Linux the operating systems that are built on top of the Linux kernel, such as Android, Debian, Ubuntu, Chrome Os, Red Hat, Fedora, Etc. Linux was first created for personal computers equipped with the Intel-x86 processor, but the fame of the operating systems created with this kernel have spread worldwide to many different platforms including servers, smartphones, routers, mini computers, smart TVs, Network Attached Storages, robots, cars, mainframe computers, super computers among others. Nowadays Linux is the most used operating system in the server space because of its security and stability, but it only holds about a 1% of the market share in the personal computer environment.  Who created Linux and when? The Linux Kernel was created by the Finnish computer science student Linus Torvalds in September of the year 1991, who back then was 21 years old. He promised that the kernel will be free for anyone to use and that they could manipulate it in any way that they wanted to. After it was released, many different companies and developers have contributed to this kernel to become what it is now.  What are distributions? In the Linux world, a Linux distribution (or distro) is the name given to the personal desktop operating systems that are built on top of the Linux Kernel. These usually can be installed in most common computer hardware because of the vast variety of drivers included in the Linux Kernel. Linux distribution usually are packed with the necessary software that a normal user will need in order to have a good computing experience, and also software centres, and other tools to easily install software. Linux distributions for the most part are free (free of cost) and are made by individuals in the community as well as companies. Most Linux distributions are usually usable out of the box without any tweaks, making it easier and less painful for users to start working with them.  Can I run my Windows applications on Linux? If you asked that to yourself while reading this, I want to ask you a question, can you run OSX applications on your windows machine? or Linux or DBS on it? If your answer is “No”, then that is your answer. Linux is a completely different operating system to Windows, which makes their applications incompatible with each other. However, there is an application under Linux called Wine (Wine is not an emulator) which allows you to run windows applications on top of a compatibility layer, which is usable and gets the work done in many different instances, and some applications run as flawlessly as if they were being run natively. There was also a certain project that wanted to achieve the same experience but with OSX applications, which I believe was called Darling. Even if you are not able to run the same applications that you used while using Windows, there is a great variety of different applications that are made to perform equally as well and at the same time have the same features in order to create the perfect alternative for those well known applications, such as Chromium, which replaces Chrome (even though you can install chrome on Linux) which performs faster and better than Chrome itself, or Kingsoft office and Libre office, which work as replacements or alternatives for the Microsoft Office suit. There are also many applications that are both working under Windows as well as Linux, such as Firefox, Steam, Chrome, Skype, Dropbox, Teamviewer, among others. Okay Angel, Linux sounds great, but why should I switch to it? Security: I’d say the main downside that Windows has is security, which is the strongest aspect of Linux. Mainly because of how fast and actively the Linux kernel is developed, as well as the small size of usage in the desktop ecosystem, as well as the way that Linux is made (you can only install applications with root permissions) allows it to be extremely secure and for attacks to your machine to be unlikely to happen (unless you give permission to it). Viruses are not a problem because many viruses are not made for it, which you need to give permission for them to attack you, and also, because Linux and Windows are very different in the way they are made, Windows viruses can not affect Linux, meaning that you can plug an usb full of windows viruses to your Linux machine and get none of them in your computer (I have done this and it is hilarious). Flexibility: Another thing that is great about Linux is that there is a lot of variation in it, as well. In the Linux Distributions there is something that is called the desktop environments, which are about the most basic way of customizing your Linux installation, you can completely change the way that you Linux desktop looks and acts, as well as the resources consumed by it. At the end I will have a slideshow with many different pictures of the different desktop environments that are available under Linux for you to use so you can see the difference between them. In the software camp, there is also a lot of flexibility as well, for instance, if you distribution comes with a music player by the default and you do not like it, you can just go on the software center and look for another one that could suit your needs better. Learning and employability: There is also the understanding that you will gain involved learning Linux. Since the most common Linux terminal commands are based of those in Unix, you could easily learn commands that will work on other platforms, such as DBS or OSX. From this you could even build a career, many employers are looking for individuals with decent skills in the Linux environment and these jobs are well paid, which is something to take in consideration with the state of our current economy. Right now, I believe that the Linux foundation is providing free online Linux courses as well that are worth hundreds of dollars for free which can give you a push into the market. Community: Moreover, the community of Linux users, although sometimes can be not so welcoming, are the most friendly folks you will ever meet and in most cases can help you with problems that you are facing. Usually, if you are facing any problem, there is about 80% chances that someone more advanced that you faced the same issue and solved it already and the answer might be somewhere online, while using Linux, google search will be your best friend, know how to use it wisely. There are other good resources such as forums, IRC chats provided by distributions, Subreddits, among other ways in which you could get help at. Knowledge is power: Knowing Linux will help you have a better understanding, not only of Linux distributions, but also other technological devices and operating system as stated before. You can take your machine and know what is going on in it, fix problems that before you though that only a technician was able to fix, make it look the way that you want it to without no boundaries, and the best thing about it, do all of this for free, no licences or paying for expensive proprietary software. At the end of this post, there will be a slideshow with many different images of different desktop environments and distributions in order for you to visually understand what I am talking about. Well, I hope that with these questions and answers you had grasped the basic understanding of what is Linux, how does it started and why you should use it. This is the first part of this basic introduction to Linux, the next part will be on picking and installing a linux distribution, In this case we will be using Ubuntu Linux as our learning environment, but after you gain some knowledge you can always switch to any other distribution of your liking, or that performs well for you. If you have any questions, suggestions, corrections, or changes to the above post, please leave it in the comments below, or contact me directly in the tab named “contact”. Thank you, please stay tuned for future posts and welcome to Linux. Hello and welcome to my blog! My name is Angel Mercedes and I am a first year college student living in the city of New York. I moved to the United Stated when I was 15 in the year 2009. Since I was a child, I have been interested in what is under the hood of all the technological stuff that we use in our everyday life, to the point that I used to have this screw driver that helped me open up everything that was not working in order to try to fix it (of course that was not the case most of the time). About in 2010, I remember that the desktop computer that me and my brother used to share was completely flooded by viruses (It was my brother’s fault for downloading random shit) and if we wanted to use it, we needed to fix it, and at that point i felt that the responsibility had fell on me, so I went to the store, grabbed some CDs, and burned a copy of Windows XP (which I had the licence for, say no to piracy, unless the game is bad) and after some time working through it, I had fixed my computer (which my brother ended up breaking the same way over and over until he got a laptop). This experience gave me a new understanding on computers. In 2011, while in a trip visiting my homeland, the Dominican Republic, my cousin introduced me to Linux. He installed Ubuntu 11.04 to my ancient laptop that I had at the time and it was working flawlessly and extremely fast, until I encountered a bug that will break the display of it, which fixed with some minutes of goggling, after this, it just ran without any problems, and since then I have been using it in my main computer (of course dual-booting it with Windows). This interest for technology also made me fall love Android smartphones and tablets. After some time, I felt that my quad-core laptop was not able to scale with my needs and I decided to build my own desktop computer, which was a great experience and I would recommend it to whoever wants an upgrade. Right now, I am the proud owner of two desktops (My main Cerberus and my server Fenrir, which doubles as a Nas), a Chromebook, a Toshiba satellite laptop, a Samsung Chromebook (Arm based), two android phones (Motorola Moto G and LG Mach) and a Raspberry Pi model B. At the end of this post I will place the different parts used and the specs of each device for you to see. This blog, as you can see will be focused on technology and computers. I will be posting many different post related to the devices that I own and the things that you can push them to do, as well as learning about Linux itself. I hope that you enjoy my blog, and again, welcome, I hope that you will enjoy the content as much as I have enjoyed writing it. I am a human and I commit mistakes and forget things, so you have any suggestions, concerns, corrections that I should make or anything else you can contact me by clicking the “Contact” tab, there you will find the different ways in which you can stay in touch with me. Desktop Computer (Cerberus)
Processor (CPU): Intel Pentium G2020 2.9GHz LGA 1155 Specs, price and information here. Motherboard: BIOSTAR TZ77A Specs, price and information here. Graphics card (GPU): EVGA 02G-P4-2643-RX GeForce GT 640 Specs, price and information here. Hard Drive: Western Digital WD Blue WD10EZEX 1TB Specs, price and information here. Ram: Kingstone HyperX 4GB GeIL DRAGON 4GB Specs, price and information here, and also here. Power Supply: APEVIA ATX-CW500WP4 Specs, price and information here. Wireless Card: Rosewill RNX-N250UBE Specs, price and information here. Led lights strip: NZXT CB-LED20-BU Specs, price and information here. Case: Not Available. (Funny story, I was looking up through my last purchases and I could not find the case there, or in Newegg, or in the page of the manufacturer, which was Diablotek). Operating System: Ubuntu 14.04 / Windows 7 home edition More information here. Ubuntu / Windows Desktop Server (Fenrir): Motherboard with APU: ASRock E350M1 AMD E-350 APU (1.6GHz, Dual-Core) Specs, price and information here. Ram: Team Elite 4GB Specs, price and information here. Case: HEC Vigilance Black Specs, price and information here. Hard Drive: Random generic drive from laptop, 160GB. Operating System: Lubuntu 14.04 More information here. Raspberry Pi Model B Price and specs here. Case: Tontec New Raspberry Pi Board Case Box Price and information here. Samsung Chromebook Price, specs and information here. |
Angel MercedesElectrical Engineering student and lover of all things Open Source, 3D Printing, Electronics and Linux. Categories
All
Archives
May 2017
|
 RSS Feed
