|
Hello everyone and welcome to my second post on learning Linux, today we will be learning how to install a real Linux distribution (Ubuntu 14.04)! [Insert yay sound]. For this tutorial you will need:
The reason that we will be using Ubuntu for this tutorial is because Ubuntu is one of the most well known and easy to use Linux distributions out there, their target is beginners that come either from Windows or from Mac OS . The community support for Ubuntu online also is very wide and if you have a problem on Ubuntu, it is likely that you will find the answer with a Google search. Although there are many other distributions that target beginners, there are a lot of distributions based on Ubuntu into after you learn the basics of installing and running Ubuntu. We will also be putting an image of Ubuntu in a flash drive in order to use it as the installation media, this is because this way is more convenient, rather than burning the image in a CD, we can just copy it to a Usb and use it that way, which will save us money and also will allow us to just format the usb and be able to reuse it again. This process won't harm the usb flash drive at all but if you have any information inside of it, please back it up somewhere safe where you won't lose it, because this process will delete all information inside of the usb. Preparing a USB flash drive with Ubuntu 14.04 for installation Downloading Universal USB Installer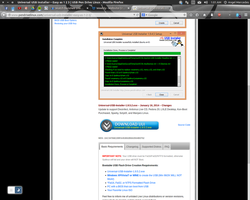 In order to start this tutorial we need to download two required items which are the program that we will be using in order to copy the Ubuntu image in the usb. First, let's download the Universal USB installer which can be found here [Click here]. When you get to this page, go down and click the button that says "download UUI" and it should download to your Downloads folder. Personally I love this tool because It is extremely reliable and at the same time gets the job done. Downloading Ubuntu 14.04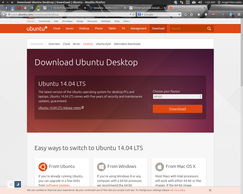 Next, we will head to the Ubuntu page in order to download the Ubuntu 14.04 image [Click Here]. Here we will have the option to choose between a 32-bit image or a 64-bit image which reffers to the architecture of the processor that you are using. If you know the architecture of your computer, choose accordingly, If you have more than 4Gigs of ram, download the 64-bit image, if you do not know your architecture and you have 2gigs or less of ram, download the 32-bit one (you can see the architecture of your cpu in "my pc", here its a video on how to determine the architecture of your computer in windows 7 [click here] ). After you choose the architecture from the drop-down, then click Download, the file should download to your Downloads file. Copying the Ubuntu image to the Flash Drive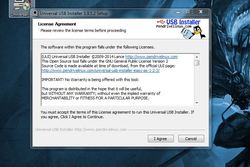 After we have downloaded the two files, we will head to the Downloads file and look for the Universal USB installer file and double click it, we also need to have our USB Flash drive connected at this point. When we open the program, we will be greeted with this screen, click "I agree" to move on to the next step. 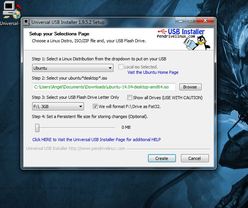 Now we are greeted with this screen, there are several options in this screen that we must break down for your understanding of this tutorial, don't worry this is a piece of cake if you know how to follow instructions. In the first option that starts with "Step 1" there is a drop-down menu with a list of Linux distributions to choose from, in our case we want to select "Ubuntu" because it is the one that we will be using for the sake of this tutorial. The option that is labeled as "Step 2" asks us to choose the Linux distribution image of the distribution that we have selected above, click the "Browse" button and look for the Ubuntu 14.04 image that we have downloaded before. Next is "Step 3" here we want to choose the USB that we will be using, please be careful and make sure that the USB that you are selecting matches with the one that you are using, to be even more careful, disconnect any other USB flash drive that you have plugged to your computer if you have others. Next we want to check the box that says format just in case, this will wipe the flash drive completely. Now the next step, "Step 4" is to set a persistent file size, and this will be extremely useful if you would like to use that USB as a livecd, I will explain to you later on how to do this. For now, lets just keep it as 0, mainly because it will take longer to create the flash drive if we add more. 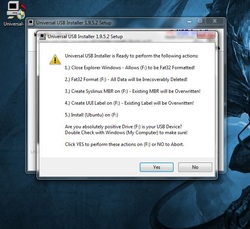 Click create and this window will pop up warning us that our data in the USB will be deleted, just click "Yes"and the process of copying the image will begin. 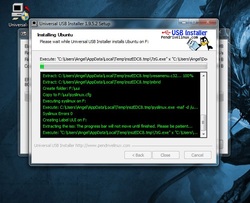 Now you can go and grab a cup of coffee or watch a video on YouTube (Maybe a Tek Syndicate video or LinusTechTips) while it copies, should not take long depending on the speed of your flash drive. 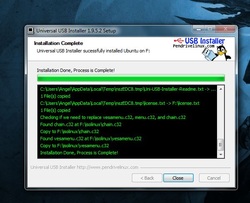 Now it is finally done, just click the "Close" button and we can now proceed to the harder part of this tutorial, booting and installing the distribution. Booting and Installing Ubuntu 14.04 Now that we have prepared our USB flash drive with the Ubuntu image, we need to restart our computer and boot from the USB. This is where it gets a little bit tricky, when our computer is first booting, maybe at the top or bottom of the screen it will say "Boot menu" and will say a certain key to press, for instance, one of my computers says F12, another one says F11 and another one says ESC, all the computers have different keys to enter the boot menu, but I believe that you can find which key is (I believe in you!). When you press this key, a menu will show up, you will use the arrow keys in your keyboard to select the name of the USB that you will use, for instance some USB flash drives have just the brand of it, hover over it and press enter and it should boot from it. Welcome to the installer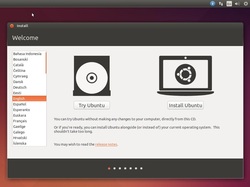 When you boot, you will see an Ubuntu logo and it will take a little bit to load and then you will see a window as the one shown at the left of this paragraph, here you will choose your language and then we have two options: Try Ubuntu: This is what is called a "LiveCD" which allows you to have a complete desktop, with all the tools that the Linux distribution will bring in it, this extremely useful because you can plug the USB in any computer and use it as if it was your personal computer. Do you remember before that step that asked us if we wanted to allocate a persistent file size? well this is where it will be used. If you set a persistent file size, if you use the LiveCD mode, all your changes can be saved, all your configurations, files, and programs installed, which pretty much gives you a full fledged personal desktop experience by using a USB. This feature came to be extremely useful for me in high school where we used to hoop into many different laptops and desktops, I was able to use my favorite distribution, keep all my configurations and programs while moving around. Also this environment includes an application called "Gparted" which allows you to create partitions and manage them. By using this, you can also retrieve files from computers that have non-functional or completely broken Operating systems like lets say a Windows 7 computer full of viruses. Install Ubuntu: As it's name states, it will allow us to install the Ubuntu distribution, since we want to install Ubuntu, we need to click this option. Preparations before installing...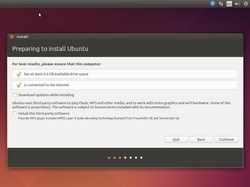 Now, Ubuntu will say that for a best installation results, we need to first be have enough space to install the distribution in, the computer needs to be connected to a power source and also needs to be connected to the internet. If you are using a laptop, at some point it will ask you to connect to a wireless network, if you do not have a wireless connection, it will just say that you can not install updates while installing or install third-party-software. Now we will have two check-boxes below: Download updates while installing: this process will make the installation process a little longer, but I will recommend it because it will automatically update your system while installing it and by the time you get to use it, all the applications will be updated and the system as well (Although we could just update our system after it installed and we will have the same result). We want to enable this option. Install Third-Party software: This is a must have, it will install proprietary codecs and software in order for us to enjoy media and other files, such as MP3 files and flash. We also want to enable this to have the best out of the box experience as possible. Note: Depending on the system that you are installing Ubuntu in, the next step could be either setting up your wireless connection or the step below. Setting up your network is pretty straight forward so I believe that there is no need for covering that step, either way after that one the next step will be the one presented below. Choosing an installation type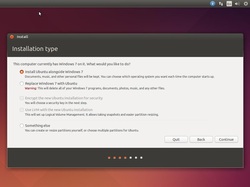 Click continue and you will be presented with this window. Now here we have different options that we can choose depending on our situation. Install Ubuntu alongside Windows 7: This option will install Ubuntu alongside Windows 7 and will divide the hard drive space depending on how you set it up to be, which will be the next step in this tutorial. We will be selecting this option for the sake of this tutorial but you can choose any of the other options if you know what you are doing. Replace Windows 7 with Ubuntu: This option will wipe out the entire hard drive and install Ubuntu in the entire hard drive, we do not want to select this option because it will also wipe our Windows 7 Installation. If you want to actually replace Windows 7 with Ubuntu, then go ahead and do it. Something else: In this option we can do our own partitioning, this is a more advanced option, but we might talk about it in the future because it is important to know how to do your own partitioning. Installing alongside Windows 7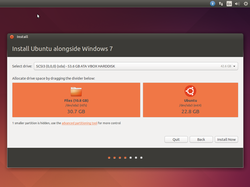 When you click continue, you will be shown a window similar to the one in the image to the left, here is where we will be choosing how much space we want to give to Ubuntu. In order to choose the amount of space that we will allocate to our Ubuntu installation, we need to select that small white bar that is in the middle of orange rectangle and either drag it left or right. After we are satisfied with our selection, we will click the "Install now" button and the installation will begin. Choosing your location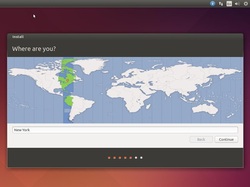 While the installation is taking place, we need to set some other stuff up. When we get to this screen, we need to select our time zone or where we are from. We can type it in the small box below the map or we can click the map directly, I live in NYC, but the installation media selected it for me automatically. When we are satisfied with our selection, we click "Continue". Choosing your keyboard layout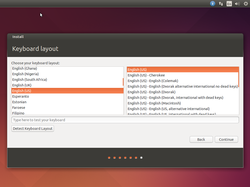 Now we have to choose our keyboard layout, it should be set automatically for you, but if this does not happen, you can set it up manually, the first square from left to right has the language and country and the right square has the layout of the keyboard. When you are satisfied and you have tested that your keyboard works as you want it to, click "Continue". Provide personal information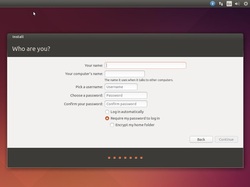 Now it is time to tell Ubuntu about us. Here we have to give our name, a password and a name for our machine. Your name: Here is where you want to put your name. You can either use your first name, first name and last name or even a nickname. Your Computer's name: This is the name that your computer will have. This will show only in the terminal and in your network. Pick a username: Here you will make a username for logging into your computer and logging into the terminal as super user. Usually this will be in full lower-case. Choose a password: Here you will create a password for your user and then you need to confirm the same password below. You can set whatever password you want, there are no restrictions. Log in automatically Vs Require my password to log in: By default, it will require your password to be able to access to log in into your account, but if you would like to set it so you don't have to always input your password to log in, you can also do so, it is more a matter of security and privacy. Encrypt your home folder: This option will encrypt the folder where all your user information (such as music, videos, downloads, etc.) is stored, that way if someone wants to steal your information, with something such a livecd or any other tools, they won't be able to access it. When you are happy with your selections, click "Continue". Almost there!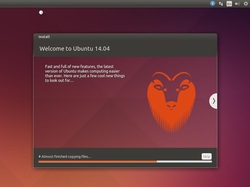 Now we are done setting up stuff and we need to wait for the installation to be done. Here we are presented with a small slideshow that we can check out with information about what is new in this release and also some default applications provided in the distribution. Now we are done!!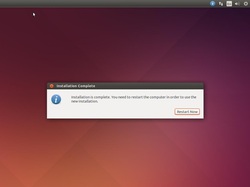 Now the installation is over! we will be greeted with this small window saying that the installation has been successful, click the button in it and your system will restart. Now we will see what is called the "Grub2" which allow us to choose the operating system that we want to boot from, we should see at the top "Ubuntu" and at the bottom of the list "Windows 7", we can choose the operating system with the arrow keys of our keyboard and select by pressing enter. 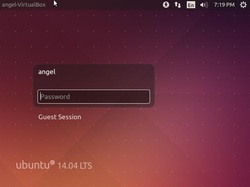 If our installation was successful, we should be able to see a screen like this, this is the log in screen of Ubuntu, we here can type our password and enter our new Ubuntu installation. 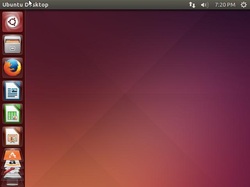 Annnddd... Congratulations! you now have a fully functional Linux install. This desktop that you see here is called the Unity desktop environment and it is unique to Ubuntu. It is very simple to use and to understand, tinker around with it and learn its ways. Again, congratulations, not a lot of people make it this far, even though it is not that complicated to install a Linux distribution. Now it is time for you to tinker around and check everything that is provided with the distribution. In my next post, we will be installing and removing applications, as well as updating your system and the different ways in which this can be achieved. Thanks for reading, if you have any questions you can post it in the comments below or contact me directly, my information is in the "Contact" tab.
0 Comments
Leave a Reply. |
Angel MercedesElectrical Engineering student and lover of all things Open Source, 3D Printing, Electronics and Linux. Categories
All
Archives
May 2017
|
 RSS Feed
